Table of contents
Open Table of contents
Intro
Writing consistent, well-formed code is important. Of course the functionality of the code is paramount, yet in addition the styling and structure should follow a commonly accepted standards. Not only will it make the code more approachable to others, but also to yourself, when you return to an old piece of software, which you have not looked at for months or even years. You might even squash some bugs early on, by writing code in consistent manner. The process of styling and checking of these code qualities, is often referred as linting.
Here’s one take on the matter, how to lint live on the text editor, as we type.
Prerequisites
Some prerequisites, to give us a starting point.
- We are running macOS 10.10+. At the time of writing, I am running
macOS Sierra 10.12.2. - We have Sublime Text installed. At the time of writing, I am running
ST 3 Dev, build 3125. - we have Python 3.6 installed. At the time of writing, I am running
Python 3.6.0installed with Homebrew.
Step One: Install Flake8
To beging linting, we obviously need a linter installed. We are going to install Flake8, which installs pycodestyle aka PEP8 (code style checks), Pyflakes (lint checks) and McCabe (complexity checks).
Note, that the Python version is the key here; If we install Flake8 to a Python version earlier than 3.6, the linting for 3.6 features will not work.
We will install the package to system level, and we are going to do that with the mighty pip
$ pip3 install flake8To check, that the linter installed correctly, run the which command, which should return the path to the executable:
$ which flake8
/usr/local/bin/flake8
At the time of writing, the versions are as follows:
$ pip3 list --format=columns
Package Version
----------- -------
flake8 3.2.1
mccabe 0.5.3
pip 9.0.1
pycodestyle 2.2.0
pyflakes 1.5.0
setuptools 33.1.1
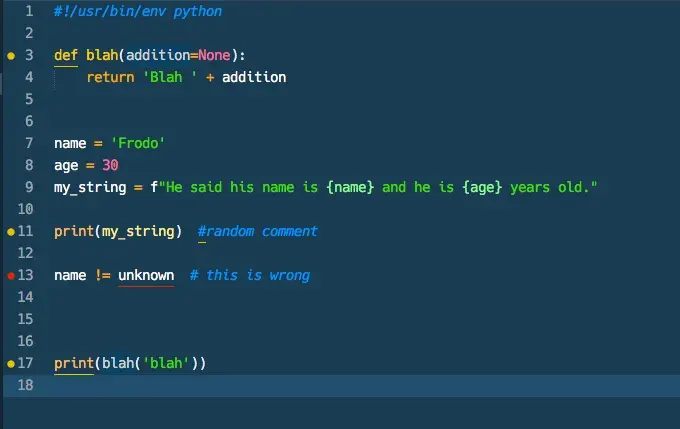
wheel 0.29.0Now, that we have a working linter, let’s run it against some poorly crafted code, like this:
#!/usr/bin/env python

def blah(addition=None):
    return 'Blah ' + addition


name = 'Frodo'
age = 30
my_string = f"He said his name is {name} and he is {age} years old."

print(my_string)  #random comment

name != unknown  # this is wrong


print(blah('blah'))
$ python3 -m flake8 f-strings.py
f-strings.py:3:1: E302 expected 2 blank lines, found 1
f-strings.py:11:19: E262 inline comment should start with '# '
f-strings.py:13:9: F821 undefined name 'unknown'
f-strings.py:17:1: E303 too many blank lines (3)
And with this we have confirmed, that we cannot code, but our linter is working, so we know what we are doing wrong, and can improve!
Step Two: Install SublimeLinter and Flake8 plugin
First we need to install SublimeLinter to Sublime Text. Do pay attention to version! Since we are running ST3, we are going to install SublimeLinter 3.
The installation should be done with ST’s Package Control. Find the package SublimeLinter, and install it.
After that sorted, let’s continue and install the Flake8 plugin on top of that. Same as before, we do it with Package Control. This time find a package SublimeLinter-flake8and install it.
We can configure the Flake8 to our liking, with settings in SublimeLinter.sublime-settings. A very basic configuration might be as follows:
"flake8": {
	"@disable": false,
	"args": [],
	"builtins": "",
	"excludes": [],
	"executable": "",
	"ignore": "E501",
	"jobs": "1",
	"max-complexity": -1,
	"max-line-length": null,
	"select": "",
	"show-code": false
},
Just to make sure Sublime Text does not begin to act up, let’s restart it.
Step Three: Keep on coding
After the previous steps completed, we can see the linting errors and warnings right in Sublime Text and update live as we code.
Now is the time to fix that hideous code, we have been working on. Happy linting!