Table of contents
Open Table of contents
Intro
Updated on June 8th, 2022
So you find yourself within a group of people called developers, and are assigned a task to develop a feature to The Project and use something called git to make your work available to your peers. You shall expose your code to the scrutiny of your colleagues by creating this mysterious pull request.
What do you do after the initial desire to turn off your laptop and run away? Grab a cup of your favourite coffee, turn your laptop back on, and tag along. It will be fine. I hope.
Note: This guide is written from macOS point of view, so if there is anything which does not seem to make sense on your setup, just search the interwebs how to do the task in question on your operating system of choice. In almost every case there will not be any differences apart from Keychain and a couple more OS specific things.
Note 2: We will be using SSH to communicate with GitHub and use a SSH key to authenticate. The other option would be to use HTTPS and Personal Access Token.
Note 3: We might be using Visual Studio Code as a text editor, and to visualize possible merge conflicts. There is no need to use VS Code specifically, any editor of your choice will do.
Setting the scene
Before digging into the project at hand, there are a couple of things to take care of.
Sign up to GitHub
Most likely your teammates will guide on this task, since there might be some team specific guidelines. If not, just follow the official guide: Signing up for a new GitHub account - GitHub Docs, and then come back. Please.
Note: Pay attention to your username and email address you used to sign up, since those will be needed on the next step.
Basic local git configuration
I presume you know what version management and git are, but did you know there is some configuration which should be set up before actually doing anything projectwise? Git stores configuration on multiple levels, but let’s focus on two of these levels, global and local a.k.a. project specific.
On the global level, you should set at least your username and email address, but there are couple more handy settings to configure. These global values will take effect on all your future projects, unless you override a setting on local level.
To check your current global git configuration, on your terminal, run:
# -l will list the config items and
# --global will set the scope of the command
git config -l --global
Observe the returned values.
To set your username (from the GitHub sign up):
git config --global user.name "YOUR NAME"To set your email (from the GitHub sign up):
git config --global user.email "your.email@address.com"Other useful things are setting the default branch for new repositories. Below we set this to a sane default main:
git config --global init.defaultBranch mainIf you want to use macOS Keychain to store authentication information (which we shall be using later on), set:
git config --global credential.helper osxkeychainI personally don’t care about the macOS default editor vi, so I also set the editor to VS Code:
git config --global core.editor "code --wait"I also don’t like the pager to be used when listing branches & logs, so I add:
git config --global pager.branch false
git config --global pager.log false
Now that we have the basic git configuration done, time to move to GitHub authentication.
SSH key and authentication setup
As I wrote earlier, we will be using SSH to communicate with GitHub and authenticate with a SSH keys. Again, as I wrote earlier, https and PAT would be the other option, but there is a great reason so standardize the communication to occur one way or the other: git submodules. I won’t cover submodules in this article, but believe me, a lot of headache can be avoided by doing the choice in the beginning.
SSH keys have significant benefits over Personal Access Token, one being security. You can secure your keys with a password, which you cannot do with PAT. With a password added to the keys as we will do, the keys cannot be used even if a malicious actor would get on hold of your SSH keys. PAT is a master key without any added security, so you probably shouldn’t lose it.
So let’s start by creating a key pair. Remember to use your right email address:
# Move to your home directory
cd
# Move to directory .ssh
cd .ssh
# Generate a new key pair
ssh-keygen -t ed25519 -C "your.email@address.com"
# When prompted, you can change the filename from default,
# for example id_ed25519_github
# When prompted, add a secure password
You should now have two files: id_ed25519_github and id_ed25519_github.pub. The file without an extension is your private key which you shall never share with anyone. Ever. The one with extension .pub is the public key, which you can basically share with anyone, as the name suggests. In this case, we will share it with GitHub, and by this key pair, GitHub will authenticate all git operations (SSH connections) from your computer to GitHub.
Now we need to add the key to the ssh-agent so it can manage the keys. First, make sure you have the SSH configuration set like we like it to be:
# First, see if the config file exists:
open ~/.ssh/config
# If you got an error that the file does not exist, create it:
touch ~/.ssh/config
Add the following content to it with the editor the file opened in, and remember to save it:
Host github.com
  User git
  AddKeysToAgent yes
  UseKeychain yes
  IdentityFile ~/.ssh/id_ed25519_github
Now you are ready to add the key to ssh-agent and store the key’s password to Keychain:
ssh-add --apple-use-keychain ~/.ssh/id_ed25519_githubThe final step is to add the public key to GitHub. First, copy the public key to clipboard:
pbcopy < ~/.ssh/id_ed25519_github.pubThen, on GitHub, navigate to your profile Settings > SSH and GPG keys and click New SSH key. Give the key a title which you will recognize later, and paste the public key and click Add SSH key. Type in your GitHub password, if prompted.
As a fun little proof that those public keys are indeed public, open a link https://github.com/[your_username].keys in a browser where you have not signed in to GitHub.
Phew, that was quite a bit of configuration, and you have not even started your project yet! Luckily, this part only needs to be done when you for example:
- switch laptop
- need to create a new SSH key (for one reason or another)
- want to change the configuration.
Of course you only need to redo the parts of the configuration, which you are missing or want to change. On to the next!
Flow with features and branches
The development workflow we are using, is the so-called feature branch development. Many other workflows exist, but let’s focus on this one for now.
Act 1: Create The Project
So you have been trusted to start a brand new project. Congrats! Let’s dig in. Please have a look at the sequence diagram below, and pay attention to the numbering. Each step will be explained below the diagram.
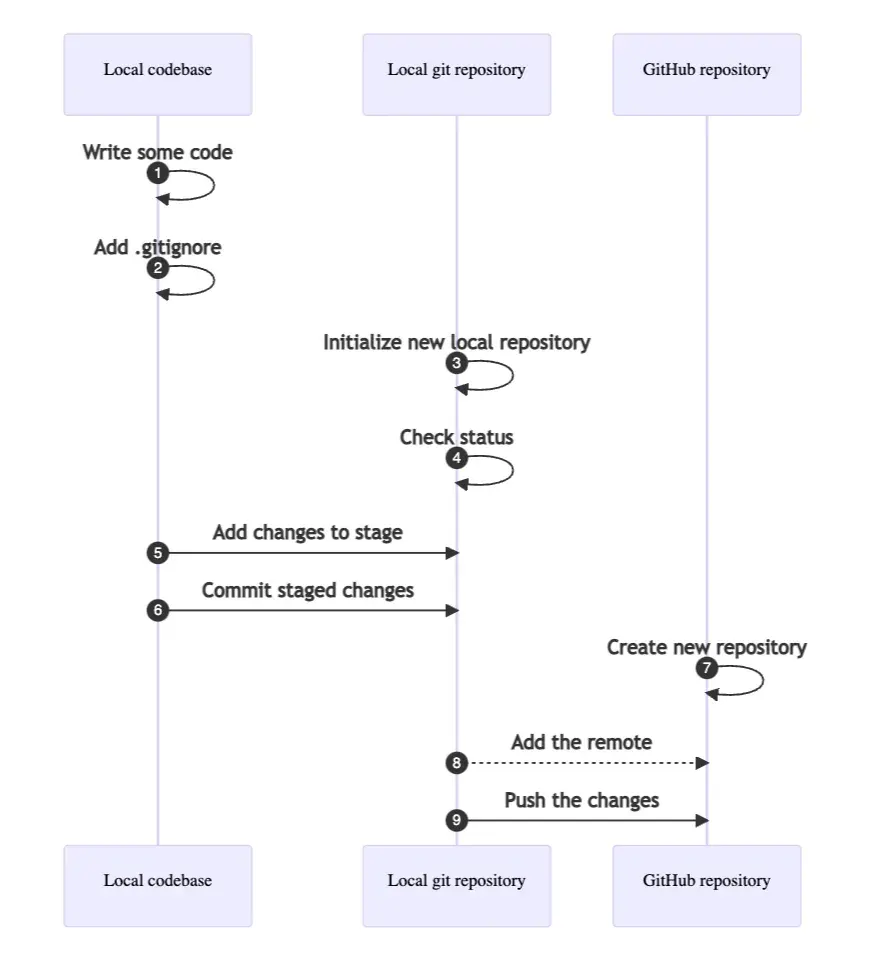 Hint: Open the sequence diagram to another browser window, so it is easier to follow.
- Write some code. The first task is to write some actual code. Let’s imagine your project is a basic Python app, which will run from a file
app.py. Also remember to add aREADME.mdwhich will contain everything one needs to know to understand what this project is about, and how to run it. But first, create the project directory to a place on your disk, where you like to maintain your projects.
# Move to projects folder
cd ~/projects
# Create the project folder
mkdir the_project
# Move to project dir
cd the_project
# Create a README.md
touch README.md
# and with the editor of your choice add the contents.
# Create Python app file
touch app.py
# and add some code, like print("Hello from The Project")
2. Add .gitignore. Next important step is to add a
 .gitignore file to the project. With this file, we can instruct git to ignore the files and folders, which we do not want to be tracked by git. Some basic examples of files that should be ignored, and never committed to version management are secrets e.g. in .env file, Python virtual environments (e.g. directory venv), Node.js node_modules directory, log files, etc. .DS_Store is a macOS specific file, which will really rub everyone the wrong way, if you commit this to git. Please don’t ask, just take this as a fact. There is a link to the official documentation at the end of this article.
# Create the .gitignore file
touch .gitignore
# Add the following lines to the file and save it:
.DS_Store
.env
venv/
*.log
3. Initialize new local repository. Tadaa, the moment is finally here! We have come a long way already, but now it is finally time to hammer in our first actual git command! Let’s initialize i.e. create a new git repository.
# Initialize a new git repository
git init- Check status. Now that we have a repository, it is quite interesting to see, what it contains. Running
git statuswill display for example the current branch, the differences between the index file and current HEAD, the differences between the working tree and the index file, and files not (yet) tracked by git. For now, we don’t have to pay too much attention to these details, to lessen the burden of learning new things.
# We can check the status with:
git status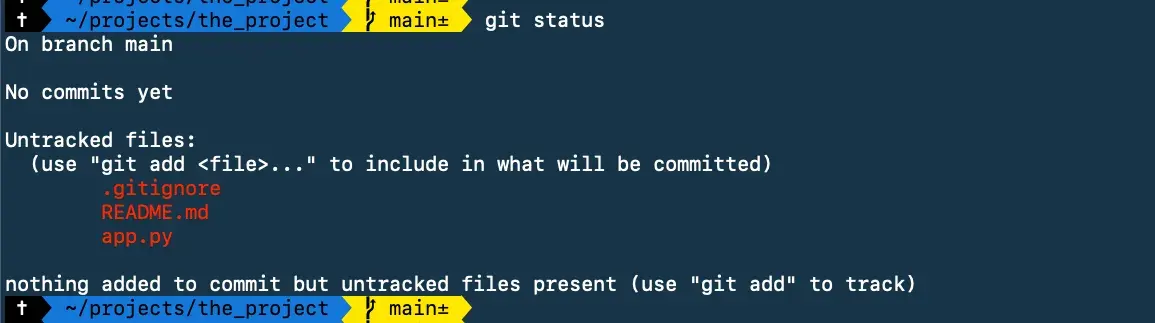 The most important things to note here are the current branch main, and list of untracked files:
 .gitignore, README.md and app.py.
5. Add changes to stage. Now that we have new content to add to git and a local repository to track these changes, let’s add our new files to git.
# Add a specific file:
git add .gitignore
# ... or add all changed files:
git add .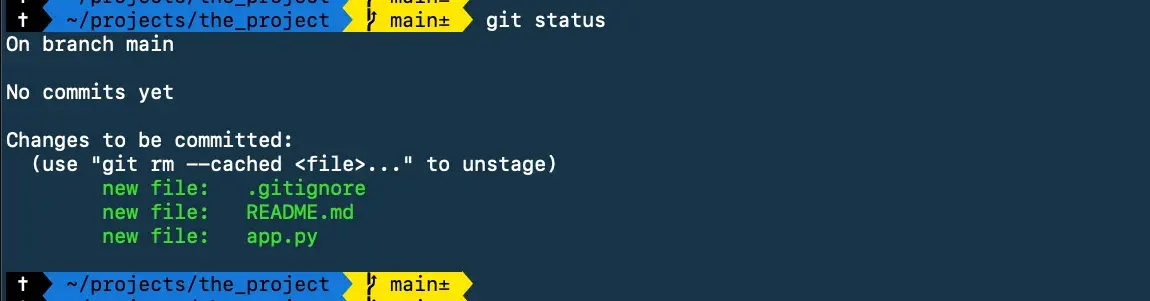 Often it is wiser/safer to add individual files, instead of mass adding everyhing.
6. Commit staged changes. Now that we have some changes staged, it is time to create our first commit. If you like analogies, you can think a commit as a zip archive which contains a snapshot of the project. Remember to add a good, informative yet short commit message with the switch
Often it is wiser/safer to add individual files, instead of mass adding everyhing.
6. Commit staged changes. Now that we have some changes staged, it is time to create our first commit. If you like analogies, you can think a commit as a zip archive which contains a snapshot of the project. Remember to add a good, informative yet short commit message with the switch -m.
git commit -m "Initial commit." Let’s check the status now:
 You can also list all commits with
 git log. Please note that each commit has a hash, or “a longish random string” associated with it. With this hash we can reference the specific commit later on.
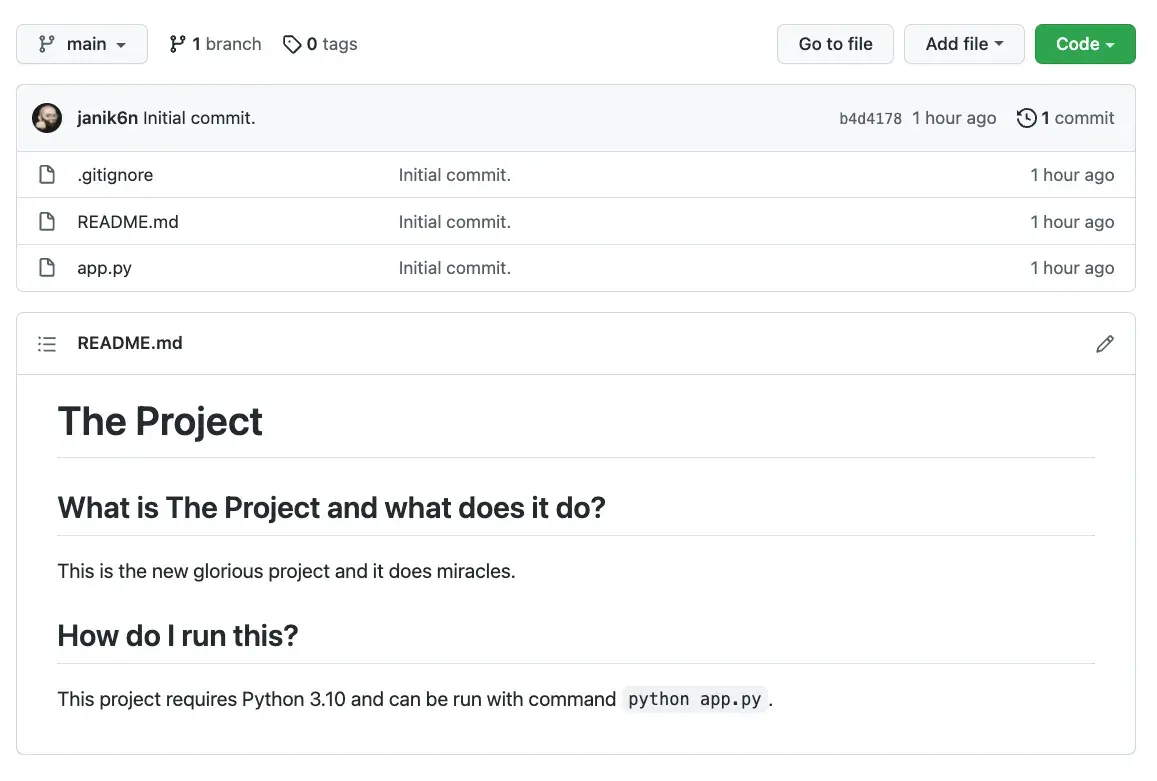
7. Create new repository. Now our new tiny project is ready to be shared with our team. Head over to GitHub on the browser. Go to your profile page, select Repositories tab and click New. Remember to select the correct owner (most likely your organization) for the new repository, and fill in the repository name, which will be the same we created locally earlier (local project folder name). Also remember to select the project visibility. Do not select to add any files on this dialog.
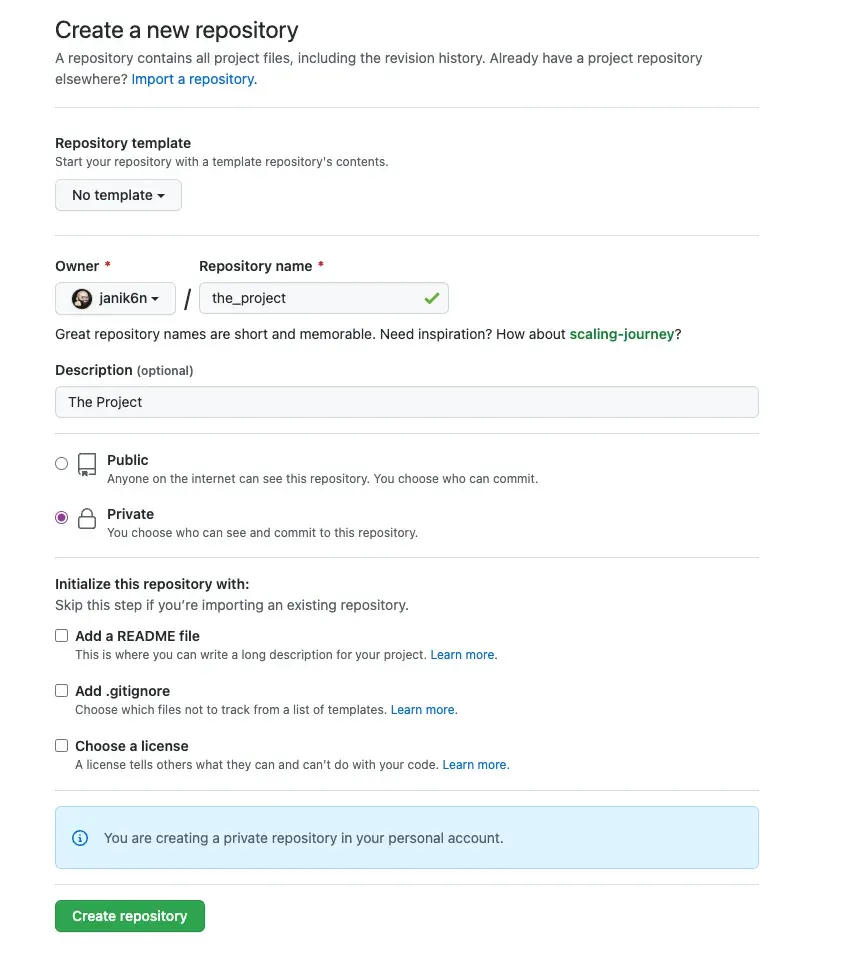 A new repository will open, and we are greeted with a wall of git commands how to get started. Instead of reading those, copy the repository address from the top of the page, remember to select the
 SSH button instead of HTTPS. The address will be in format like git@github.com:owner/the_project.git.
8. Add the remote. Now we have git repository on our local disk and another one on GitHub. Let’s make these know about eachother. In the following command the origin is a “given name” for the GitHub remote repository. In some cases you can have multiple remotes, so you should call each of them with a name you and your team will recognize. We will be sticking with the default origin in this case.
git remote add origin git@github.com:owner/the_project.git- Push the changes Now that our local project is configured to know about a remote, it is time to make our code available to the rest of the team. So, we will push our code from our local machine to GitHub. Pay attention to the flag
-u, which will set the upstream, also called a remote-tracking branch for the current local branch. This-uis only needed for the first push for each new branch.
git push -u origin main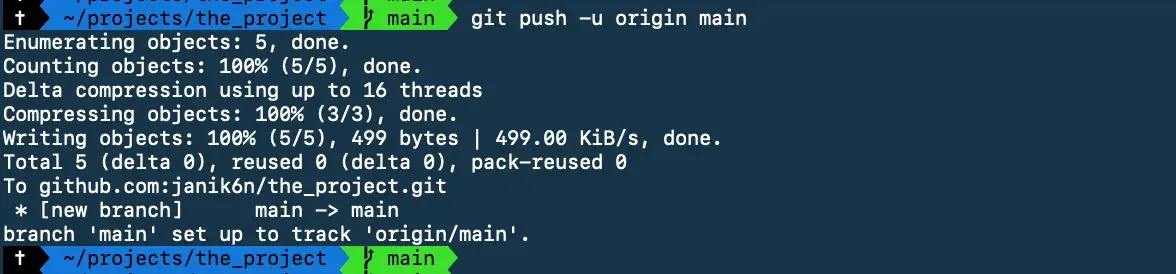 This was the first time, the SSH key authentication (and so the SSH connection) to GitHub was used. Have a look at the git branches our repository is now aware of:
# With the flag -a we can list remote branches too
git branch -a
# This should return:
 *main
  remotes/origin/main
# ... where the asterisk denotes the current branch
We can also check the status, which will now show additional information about the remote repository:

And just like that, our project is alive, and can be further developed by our team!
Act 1: Bonus
There are a couple of handy git commands, which we should be aware of:
- List remotes configured for the project:
git remote- Show details of remote
origin:
git remote show origin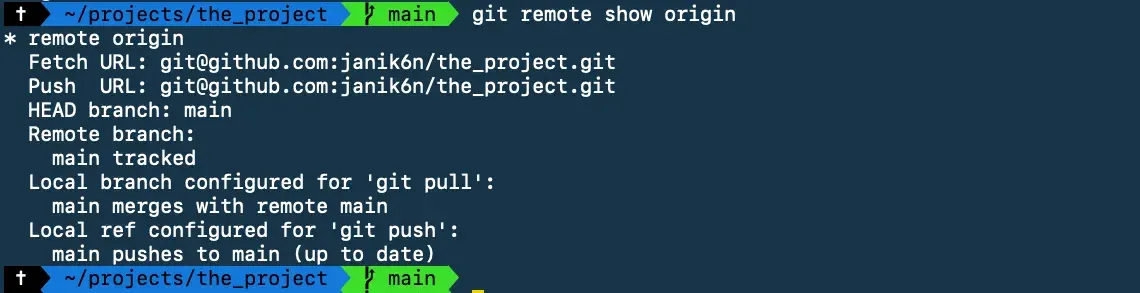
Act 2: Create a new feature
In the act two we will create a new feature to our project. As stated earlier, we will use feature branch development as our workflow. This can be visualized as the following sequence diagram:
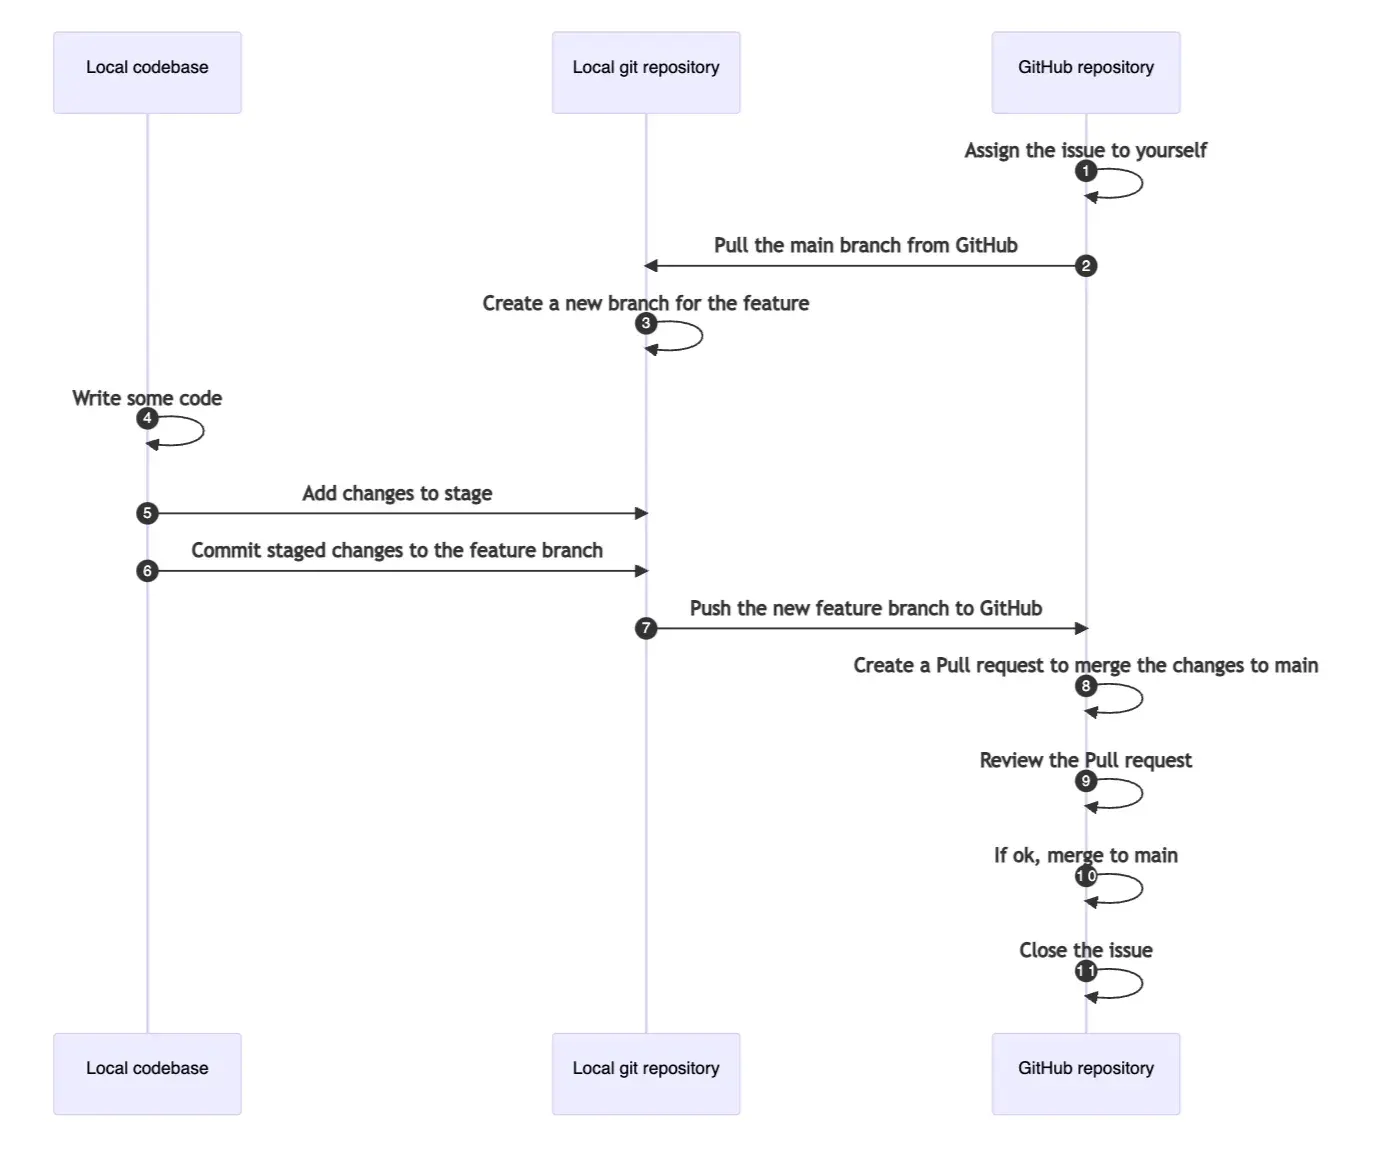
- Assign the issue to yourself. In this example we are using GitHub issues to track our work on the project. Always remember to assign the issue to yourself, so everyone on your team knows who is working on what.
- Pull the main branch from Github It is always important to work on the latest code base to avoid merge conflicts and other issues in the future. To start our work on a new feature, our starting point will be the latest version of the
mainbranch. Since main is our only branch at the moment, on your local project folder:
# Just to make sure there already is not a branch
# for the issue 1, check all remote branches
git branch -a
# Pull the main branch from GitHub to local
git pull
At this time there were no changes to the code which we already had on our local machine.
3. Create a new branch for the feature Create a new branch for our new code, so we will not mess with the main branch code. This is one of the strongest tools you get when working with version control and git. You can safely develop new things without messing your orginal working code. The new branch will be based on the code of the current branch, so we are building on top of our previous work. Pay attention to the naming of the new branch. This is something to decide with your team, here we will use the convention
At this time there were no changes to the code which we already had on our local machine.
3. Create a new branch for the feature Create a new branch for our new code, so we will not mess with the main branch code. This is one of the strongest tools you get when working with version control and git. You can safely develop new things without messing your orginal working code. The new branch will be based on the code of the current branch, so we are building on top of our previous work. Pay attention to the naming of the new branch. This is something to decide with your team, here we will use the convention feat-[issue_number]. Create a new branch with:
# Since we are working on issue 1
git switch -c feat-1
If we now check the branches, we can see that we are working on the new branch
 feat-1:
 4. Write some code Our GitHub issue describes the task as “Print another line of text”, so this leaves quite a bit room for implementation.
open app.py# and add a line:
print("This is another line of text.")Our full app.py should now be:
print("Hello from The Project")
print("This is another line of text.")- Add changes to stage Once again we have changes, as you can see with
git status: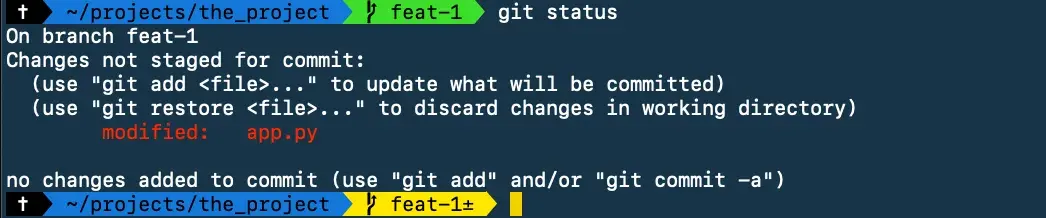 Stage this change with
 git add app.py, and see the status again withgit status:
- Commit staged changes to the feature branch Our little feature is now ready to be committed to our local branch
feat-1. As we learned earlier, we do the commit by running:
# Remember to add a descriptive commit message
git commit -m "Added second print function to app"
7. Push the new feature branch to GitHub If we now check the branches our git repository knows about with
 git branch -a, we should see three branches: two local and one remote:
 While we push the commit to GitHub and this is a brand new branch for the remote repository, we will and the
 -u flag to set the upstream for this branch, just as we did for main earlier. To our code, run:
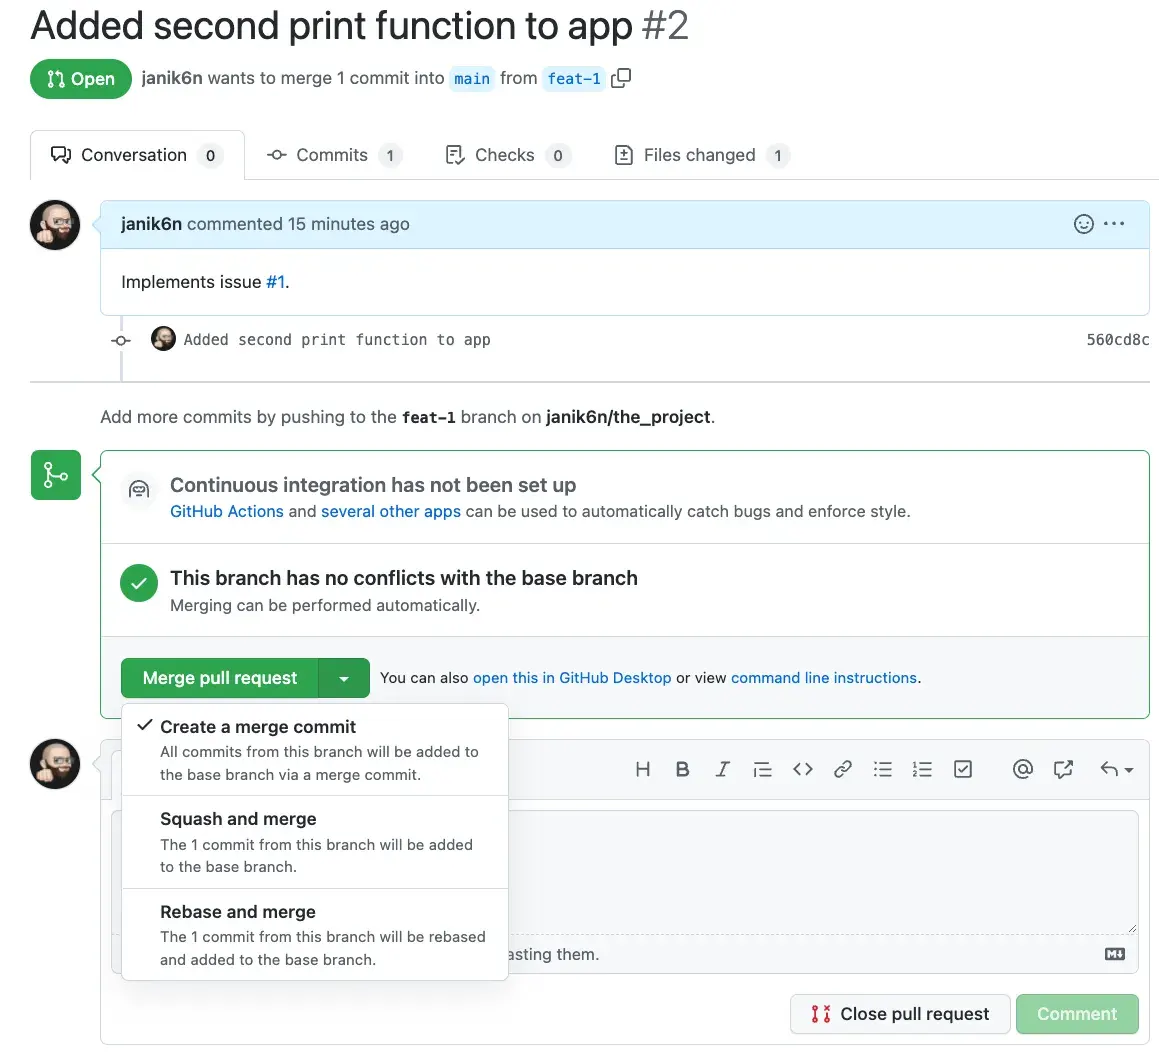
git push -u origin feat-1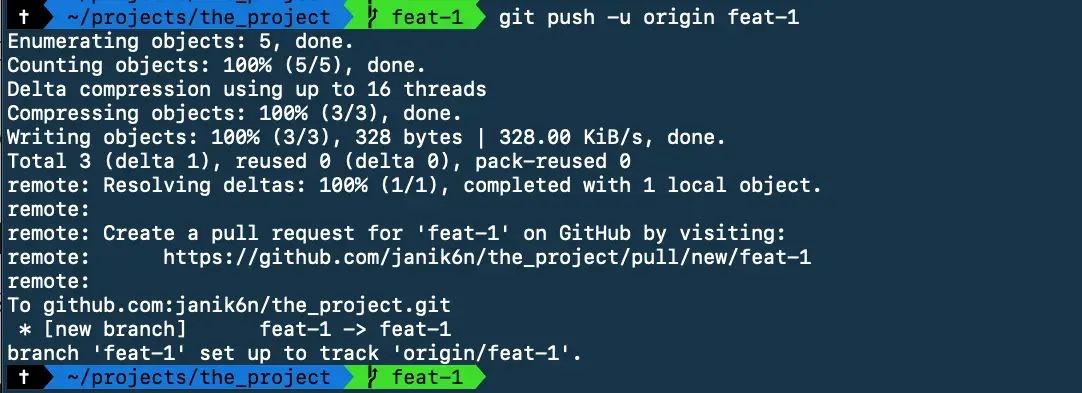 8. Create a Pull request to merge the changes to main In this worflow we are using Pull requests to merge our branches to main, so the next step is to go to GitHub and create a new Pull request. In the frontpage of the repository we will see a handy notification:
 Click the button
 Compare and pull request. The Pull request template opens, where you can compare your changes between branches, in this case between main and feat-1, since we want to merge feat-1 to main. Fill in the details:
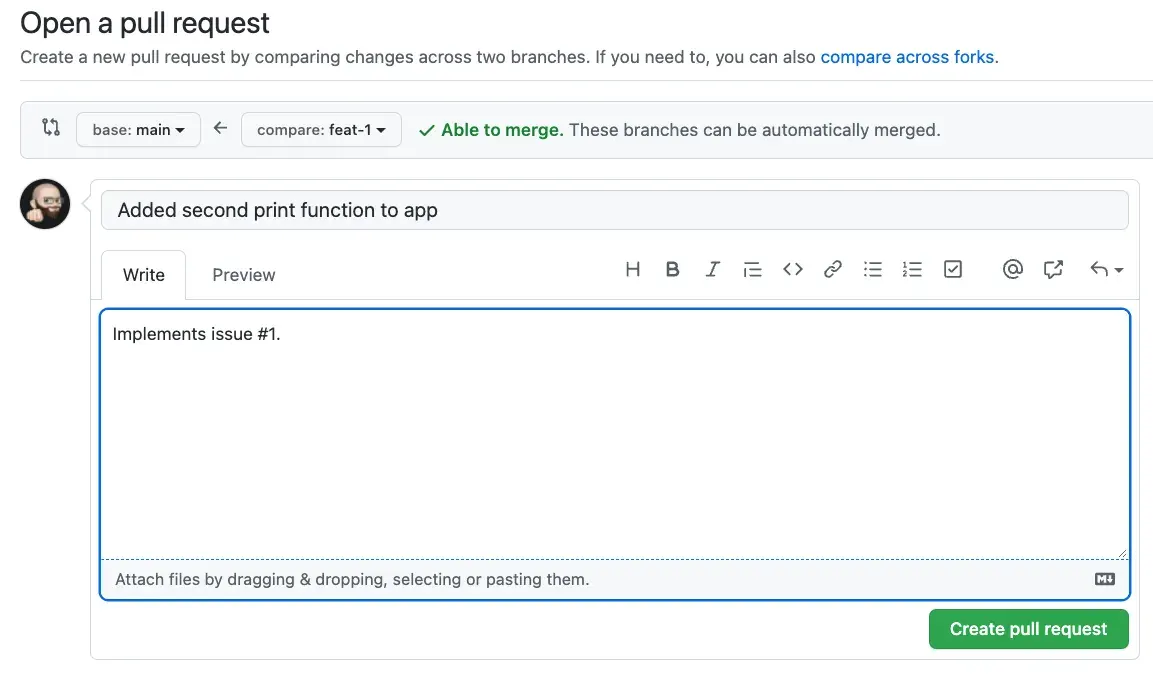 The title will be prefilled from our commit message. In the description box we can add any details we feel helpful for the reviews. At least we should add a reference to the issue with
 #1, this will create a link to the issue. Click the Create pull request button to save. Even though our project does not have any Continuous Integration set up with GitHub Actions, GitHub helpfully tells us if there are any conflicts or if the code can be merged.
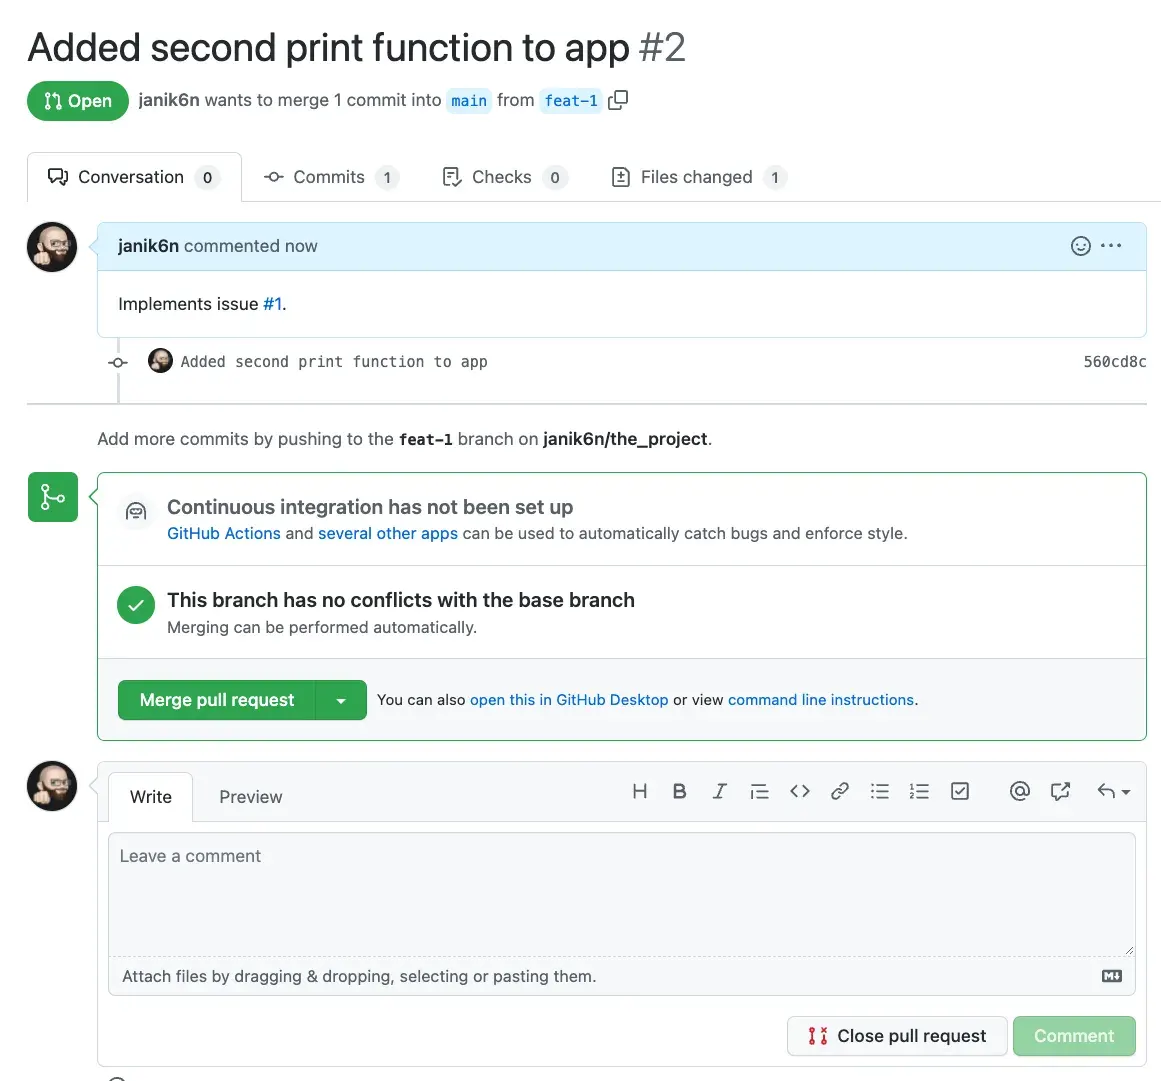 Sidenote: In real life you will most likely have CI set up, and a formal process to handle Pull requests. Maybe a list of people, who you should add as reviewers, etc.
9. Review the Pull request In this example project we will review the Pull request ourselves. When reviewing the Pull request, at a minimum we should check:
- Commits the Pull request contains
- Files changed to review the actual code changes as seem necessary/relevant
- Checks to see the possible error messages from CI / GitHub Actions.
Sidenote: In real life you will most likely have CI set up, and a formal process to handle Pull requests. Maybe a list of people, who you should add as reviewers, etc.
9. Review the Pull request In this example project we will review the Pull request ourselves. When reviewing the Pull request, at a minimum we should check:
- Commits the Pull request contains
- Files changed to review the actual code changes as seem necessary/relevant
- Checks to see the possible error messages from CI / GitHub Actions.
If needed, discuss about the Pull request on the Conversation tab to work out possible issues before the merge can happen.
10. If ok, merge to main When all is good, we as a reviewer, could hit the inviting Merge pull request button, but we will not do such thing! This would merge all commits to main branch as individual commits, but this could result as messy git history. Most likely no one is interested about the individual commits we made in the feat-1 branch within the main branch. Much better option is to squash the commits into one, during the merge operation. This will result just a single commit to main, containing all the changes included in the Pull request. The individual commits can still be seen in the feat-1 branch, should anyone want to see those. So, open the dropdown, and select Squash and merge option. Sidenote: In this case we had only one commit, so this does not make much difference, but in real life most likely we will create many commits during day/days before our feature is complete and ready to be merged. Click Squash and merge, and if we are still sure confirm the merge.
 GitHub did all the hard work, and the Pull request has now been successfully merged and closed:
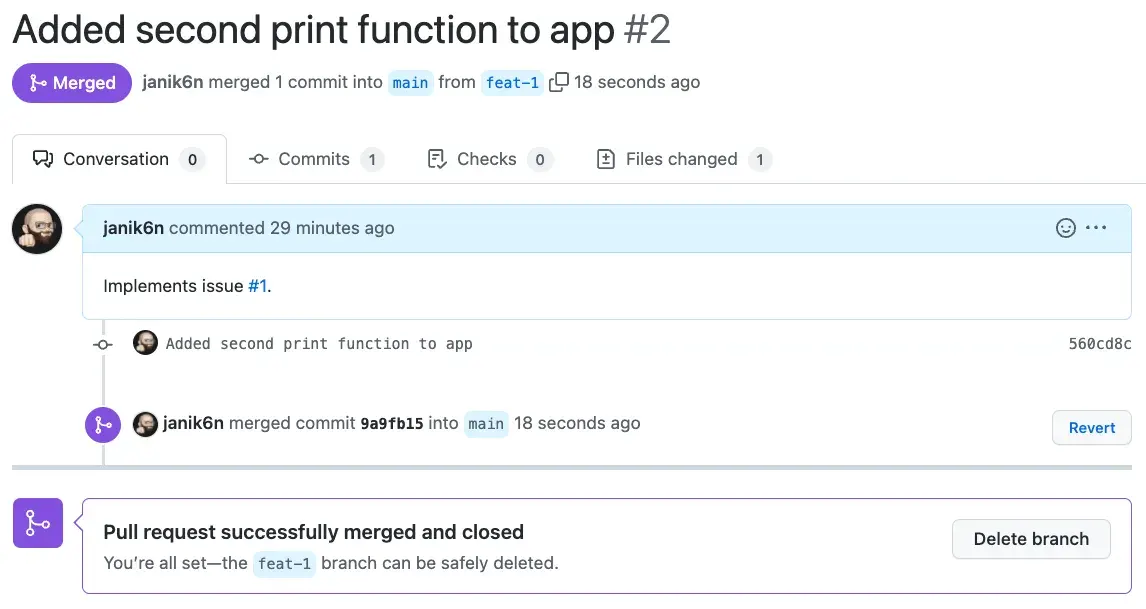 Depending what we have agreed within our team, the whole
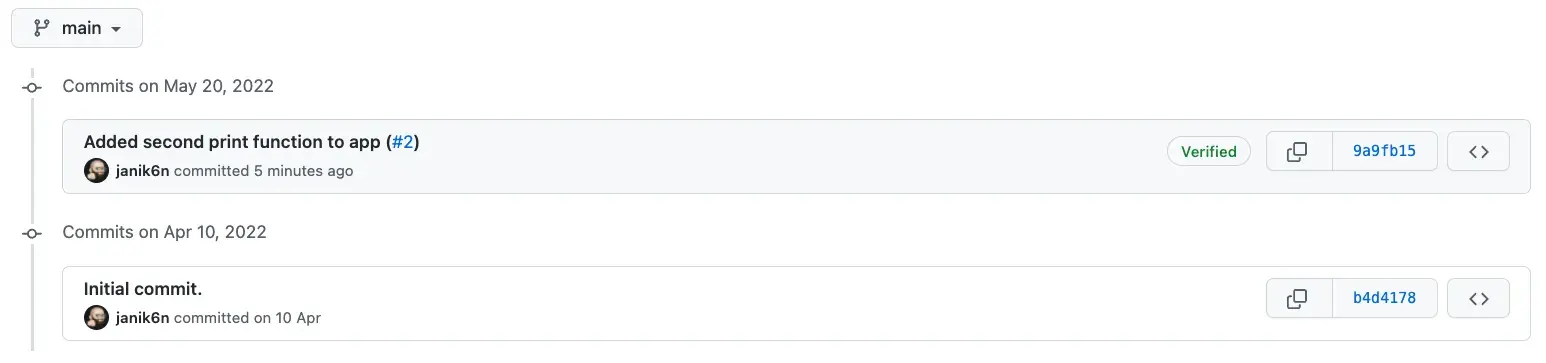
 feat-1 branch could now be deleted, but I tend to keep this around for a while, especially since we squashed our commits during merge. If we now check the commits on the main branch, we can see our merged & squashed commit there:
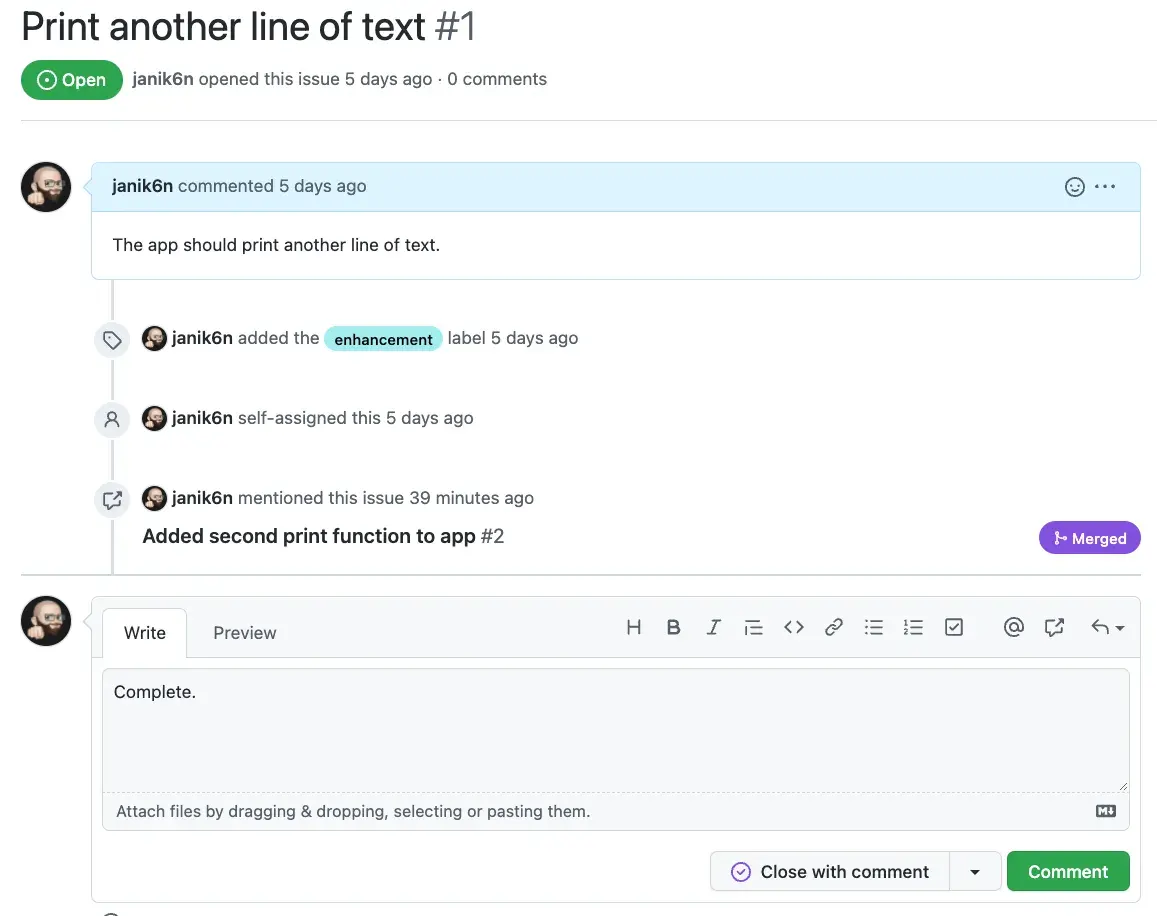
 And if we check the issues, we can see the issue the Pull request merge automatically created:
 11. Close the issue Now that the new feature is complete and our code is merged, it’s time to close the issue. Add a comment, make sure the option
 Close with comment has been selected, click Close with comment, and enjoy a well earned cup of coffee.
Note: The same workflow we just went through on the act 2 is well suited for bug fixes too, not just new features. In case of a bugfix, we could name the branch as bug-[issue_number], for example bug-1.
Act 3: Work on an existing feature someone else has started
This will have a lot common with the workflow on the Act 2: Create a new feature.
Note: If we have never worked on the project, and do not have a local repository at all, move to our projects “home” directory, clone the repository with git clone [repository ssh address, like git@github.com:owner/the_project.git] and skip the steps 2 and 3.
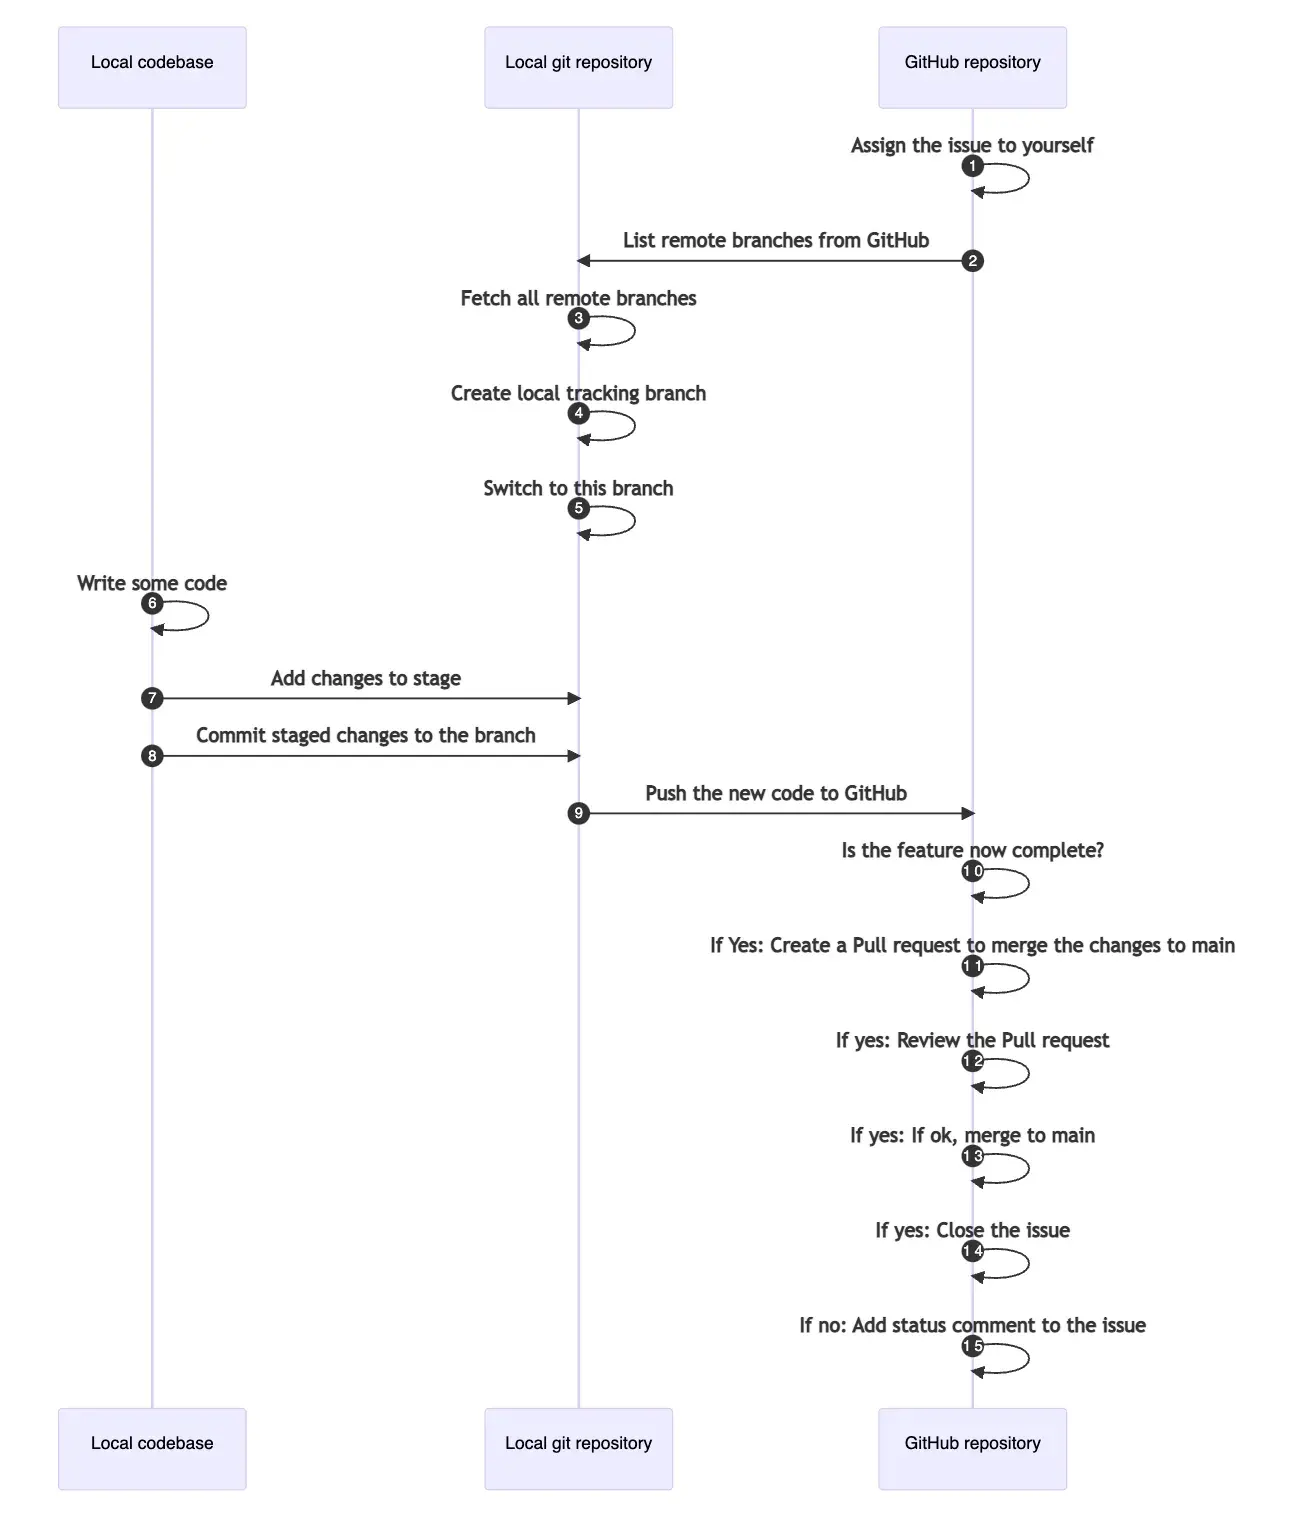
- Assign the issue to yourself Someone else has started the implementation, which we are now continuing to work on. Always remember to assign the issue to yourself, so everyone on your team knows who is working on what.
- List remote branches from GitHub If we list all branches, which our local repository knows about with
git branch -a, we will not see the new branch on GitHub we should start working on. Instead, we will query all remote branches (or references to be more specific) withgit ls-remote: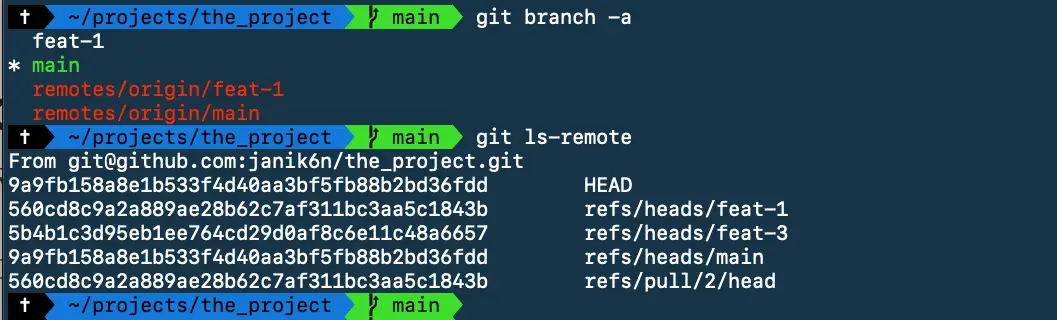 On this list we can see that there is a reference
 refs/heads/feat-3which will contain the starting point for our work. - Fetch all remote branches Next step is to get the new code from GitHub to our local development environment. We will do this without merging any branches, with:
git fetch origin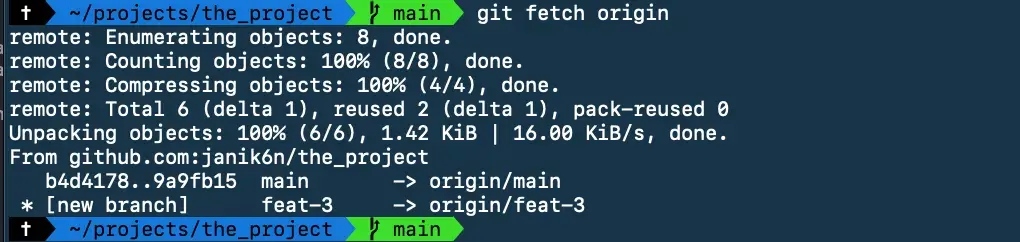 If we now list local branches again with
 git branch -a:
 4. Create local tracking branch Now we need to create a new local tracking branch for the this remote
 remotes/origin/feat-3. We should keep the branch name consistent, so:
# git branch --track [local-branch-name] [remote-branch-name]
git branch --track feat-3 origin/feat-3![]() And again if we list the branches with
And again if we list the branches with git branch -a:
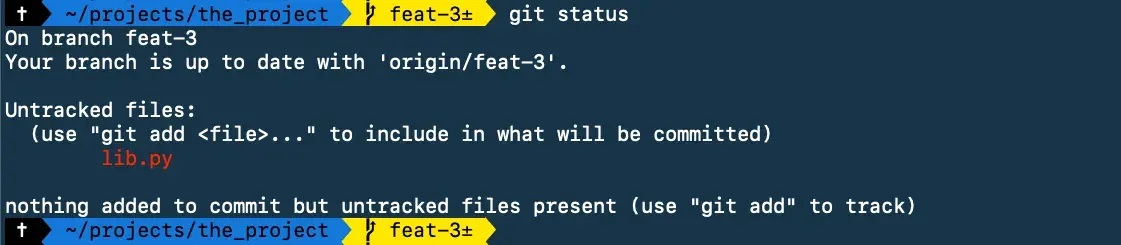
 5. Switch to this branch Let’s switch to branch
 feat-3 with git switch feat-3.
 Let’s list the local files in our working directory:
 There seems to be a promising new file
 additional.py which the previous developer has created while she started to work on the new feature.
6. Write some code The new additional.py contains a new print function:
print("Additional text!")And our code change to complete the feature is to import this code to app.py, which will contain the following code after our changes:
import additional
print("Hello from The Project")
print("This is another line of text.")- Add changes to stage Just like in Act 2, check the unstaged changes with
git status, and add the only change inapp.pywithgit add app.py. - Commit staged changes to the branch Again, just as in Act 2, commit the staged changes with
git commit -m "Imported additional print from module to app". - Push the new code to GitHub We can now check the status of our local repository with
git status: As the handy message states, we can push our local changes to GitHub with just
 git pushwithout any additional details. Since we set up the branch tracking earlier, git knows which local and remote branches belong together.
- Is the feature now complete? If the feature (or a bugfix) is now complete, do the If yes steps. If it is not yet complete, do the If no steps.
- If Yes: Create a Pull request to merge the changes to main This is described in detail on Act 2, step 8.
- If yes: Review the Pull request This is described in detail on Act 2, step 9.
- If yes: If ok, merge to main This is described in detail on Act 2, step 10.
- If yes: Close the issue This is described in detail on Act 2, step 11.
- If no: Add status comment to the issue If the work is not yet ready to be merged, add a comment for our colleagues (or future self) where we left off.
Oh no, I made a mistake! Is this the end?
Do not through away your computer just yet, let’s see what we can do. In this chapter we will go through a few scenarios, where we might find ourselves.
Remove unstaged & uncommitted file(s)
In the first case we have not yet staged or committed the file which needs to be removed, lib.py in this case. Git of course has noticed the file:
 This is easy, just delete the file and that’s it.

Or, if we want to use git for this, we surely can:
# First, a dryrun to see what will happen
~/projects/the_project: git clean -dn
Would remove libs.py

# and to actually delete them
~/projects/the_project: git clean -df
Removing libs.py
Remove staged but uncommitted file
In the second case we have staged, but not yet committed the file which needs to be removed, lib.py in this case.
# Create new file
~/projects/the_project: touch lib.py
# Check git status
~/projects/the_project: git status
On branch feat-3
Your branch is ahead of 'origin/feat-3' by 1 commits.
  (use "git push" to publish your local commits)

Untracked files:
  (use "git add <file>..." to include in what will be committed)
	lib.py

nothing added to commit but untracked files present (use "git add" to track)

# Add to stage
~/projects/the_project: git add lib.py
# Check git status again
~/projects/the_project: git status
On branch feat-3
Your branch is ahead of 'origin/feat-3' by 1 commits.
  (use "git push" to publish your local commits)

Changes to be committed:
  (use "git restore --staged <file>..." to unstage)
	new file:   lib.py

# Now delete the file
~/projects/the_project: rm lib.py
# Check git status again
~/projects/the_project: git status
On branch feat-3
Your branch is ahead of 'origin/feat-3' by 1 commits.
  (use "git push" to publish your local commits)

Changes to be committed:
  (use "git restore --staged <file>..." to unstage)
	new file:   lib.py

Changes not staged for commit:
  (use "git add/rm <file>..." to update what will be committed)
  (use "git restore <file>..." to discard changes in working directory)
	deleted:    lib.py
We can see that the staged lib.py is still there, and now there is another change too: the removal of lib.py.
The file itself is already deleted, but we need to tell git to forget it too:
# remove lib.py from working tree
~/projects/the_project: git rm lib.py
# Check status again
~/projects/the_project: git status
On branch feat-3
Your branch is ahead of 'origin/feat-3' by 1 commits.
  (use "git push" to publish your local commits)

nothing to commit, working tree clean

# List the files in git index
~/projects/the_project: git ls-files
.gitignore
README.md
additional.py
app.py
Remove committed file
In the third case we have already committed the file which needs to be removed, libs.py in this case.
# Create, add and commit
~/projects/the_project: touch libs.py
~/projects/the_project: git add libs.py
~/projects/the_project: git commit -m "added libs.py"
In order to remove to libs.py from HEAD, which is the same as our latest commit, we first need to restore it to stage:
~/projects/the_project: git restore --source=HEAD^ --staged -- libs.py
On branch feat-3
Your branch is ahead of 'origin/feat-3' by 1 commits.
  (use "git push" to publish your local commits)

Changes to be committed:
  (use "git restore --staged <file>..." to unstage)
	deleted:    libs.py

Untracked files:
  (use "git add <file>..." to include in what will be committed)
	libs.py

# Then we can remove it from working directory
~/projects/the_project: rm libs.py
# Check git status
~/projects/the_project: git status
On branch feat-3
Your branch is ahead of 'origin/feat-3' by 1 commits.
  (use "git push" to publish your local commits)

Changes to be committed:
  (use "git restore --staged <file>..." to unstage)
	deleted:    libs.py

# Amend the previous commit with the file removal:
# Since this was the only file changed in the commit,
# We need to add --allow-empty
~/projects/the_project: git commit --amend --allow-empty

# Finally check status again:
~/projects/the_project: git status
On branch feat-3
Your branch is ahead of 'origin/feat-3' by 1 commits.
  (use "git push" to publish your local commits)

nothing to commit, working tree clean
Now the libs.py is gone.
Undo unstaged changes in a tracked file
In this scenario we have edited a file, and want to restore it to the most recently committed state. The file is not staged yet either. So, let’s edit app.py to get started, and then:
# Check status
~/projects/the_project: git status
On branch feat-3
Your branch is ahead of 'origin/feat-3' by 1 commits.
  (use "git push" to publish your local commits)

Changes not staged for commit:
  (use "git add <file>..." to update what will be committed)
  (use "git restore <file>..." to discard changes in working directory)
	modified:   app.py

no changes added to commit (use "git add" and/or "git commit -a")

# Restore app.py from HEAD
~/projects/the_project: git restore app.py
If we have modified multiple files:
~/projects/the_project: git status
On branch feat-3
Your branch is ahead of 'origin/feat-3' by 1 commits.
  (use "git push" to publish your local commits)

Changes not staged for commit:
  (use "git add <file>..." to update what will be committed)
  (use "git restore <file>..." to discard changes in working directory)
	modified:   additional.py
	modified:   app.py

# Restore them all with the dot option
~/projects/the_project: git restore .
Please note that this does not delete “new” untracked files, though. We have already gone through how to get rid of those in the chapter Remove unstaged & uncommitted file(s).
Undo staged changes in a file
What if we have already staged a file, but we just saw an error we need to fix by restoring the file to its previous state? Let’s edit app.py and then:
# Add app.py to stage
~/projects/the_project: git add app.py
# and check the status
~/projects/the_project: git status
On branch feat-3
Your branch is ahead of 'origin/feat-3' by 1 commits.
  (use "git push" to publish your local commits)

Changes to be committed:
  (use "git restore --staged <file>..." to unstage)
	modified:   app.py

# Unstage app.py
~/projects/the_project: git restore --staged app.py

# Restore the previous version
~/projects/the_project: git restore app.py
The file app.py is now in its previous committed state.
Rollback commit locally
What if we want to rollback a bad local commit? First, let’s create a bad commit to play with:
# Create new file
~/projects/the_project: touch bad.txt
# Add to stage
~/projects/the_project: git add bad.txt
# Commit it
~/projects/the_project: git commit -m "Added bad.txt"
Now, depending what we want, we have options: First option is just to delete commit, and leave files on stage:
~/projects/the_project: git reset --soft HEAD~1

~/projects/the_project: git status
On branch feat-3
Your branch is ahead of 'origin/feat-3' by 1 commits.
  (use "git push" to publish your local commits)

Changes to be committed:
  (use "git restore --staged <file>..." to unstage)
	new file:   bad.txt
Or, we can delete the commit and unstage the files:
~/projects/the_project: git reset HEAD~1

~/projects/the_project: git status
On branch feat-3
Your branch is ahead of 'origin/feat-3' by 1 commits.
  (use "git push" to publish your local commits)

Untracked files:
  (use "git add <file>..." to include in what will be committed)
	bad.txt

nothing added to commit but untracked files present (use "git add" to track)
Or, as the last and most destructive option, we can delete the commit, unstage the files, and also remove them from the working directory:
~/projects/the_project: git reset --hard HEAD~1
# Check status
~/projects/the_project: git status
On branch feat-3
Your branch is ahead of 'origin/feat-3' by 5 commits.
  (use "git push" to publish your local commits)

nothing to commit, working tree clean
Our working directory and git history are now in their previously committed state, and we can start over.
Delete local branch
Sometimes we need to create temporary branches while working, and when they are not needed anymore, they should be removed. How can we accomplish this?
# Create a new temporary branch
~/projects/the_project: git switch -c temp1
# and check the local branches
~/projects/the_project: git branch
  feat-1
  feat-3
  main
* temp1

# Switch back to branch feat-3
~/projects/the_project: git switch feat-3
# Delete branch temp1
~/projects/the_project: git branch -d temp1

# If we need to force the deletion
~/projects/the_project: git branch -D temp1
# We can also delete multiple branches at once
~/projects/the_project: git branch -d temp1 temp2 otherbranch
Warning: Never delete a remote commit or branch, unless you absolutely know what you are doing, and why you are doing it. This might break/destroy in a very bad way the hard work ourselves and our colleagues have done earlier.
Intermission
Sometimes while developing away, we get sidetracked. We have changed the code on our current branch, and need to quickly jump to another task, but do not want to “dirty” our git history by making an unnecessary and incomplete commit. This is where stashing comes in.
When we have changed some files which are neither staged nor committed, and want to stash them for a while:
# Some changed files
~/projects/the_project: git status
On branch feat-3
Your branch is ahead of 'origin/feat-3' by 1 commits.
  (use "git push" to publish your local commits)

Changes not staged for commit:
  (use "git add <file>..." to update what will be committed)
  (use "git restore <file>..." to discard changes in working directory)
	modified:   app.py
	modified:   foo.txt

no changes added to commit (use "git add" and/or "git commit -a")

# Stash these changes
~/projects/the_project: git stash push -m "added some new things"
Saved working directory and index state On feat-3: added some new things
In addition to saving the changes to a stash, our working directory was restored to previous HEAD.
We can list the saved stashes:
~/projects/the_project: git stash list
stash@{0}: On feat-3: added some new things
Get stashed changes and apply them again (index 0 being the newest):
~/projects/the_project: git stash pop 0
On branch feat-3
Your branch is ahead of 'origin/feat-3' by 1 commits.
  (use "git push" to publish your local commits)

Changes not staged for commit:
  (use "git add <file>..." to update what will be committed)
  (use "git restore <file>..." to discard changes in working directory)
	modified:   app.py
	modified:   foo.txt

no changes added to commit (use "git add" and/or "git commit -a")
Dropped refs/stash@{0} (e2b3344ff7ce66dd6fc5a74eb4091932e2792162)
When we add and commit the changes, this will clear the stash. We can also clear the stash manually with git stash clear.
I seem to have misplaced the HEAD
Sometimes you end up in a situation, where git boldly states: You are in 'detached HEAD' state. What does it mean exactly?
First let’s describe the HEAD briefly. HEAD is basically a pointer in git which determines the working revision and thus the contents of the working directory. When we checkout branches or create commits, git automatically moves the HEAD to point to it.
When we checkout a commit hash instead of a proper branch, we end up in this detached HEAD mode. Also working with submodules and rebasing can cause this to happen, but these are out of the scope of this article.
Let’s simulate, how we might end up here by checking out a previous commit:
# Get a commit hash from git log
~/projects/the_project: git log
commit 5c027b3897412328fa7d9b809edab4cccef6a2dc (HEAD -> feat-3)
Author: janik6n <your.email@address.com>
Date:   Sat May 21 18:19:30 2022 +0300

    Added foo.txt

# Checkout previous commit
~/projects/the_project: git checkout 5c027b3897412328fa7d9b809edab4cccef6a2dc
Note: switching to '5c027b3897412328fa7d9b809edab4cccef6a2dc'.

You are in 'detached HEAD' state. You can look around, make experimental
changes and commit them, and you can discard any commits you make in this
state without impacting any branches by switching back to a branch.

If you want to create a new branch to retain commits you create, you may
do so (now or later) by using -c with the switch command. Example:

  git switch -c <new-branch-name>

Or undo this operation with:

  git switch -

Turn off this advice by setting config variable advice.detachedHead to false

HEAD is now at 5c027b3 Added foo.txt
If we make any changes in detached HEAD mode, they do not belong to any git branch. In order to save them, we need to take a few steps to do so:
# Edit app.py
# Add new file foo2.txt
~/projects/the_project: touch foo2.txt
# Check status
~/projects/the_project: git status
HEAD detached at 5c027b3
Changes not staged for commit:
  (use "git add <file>..." to update what will be committed)
  (use "git restore <file>..." to discard changes in working directory)
	modified:   app.py

Untracked files:
  (use "git add <file>..." to include in what will be committed)
	foo2.txt

no changes added to commit (use "git add" and/or "git commit -a")

# Add changes to stage
~/projects/the_project: git add .
# And create a commit
~/projects/the_project: git commit -m "Did changes in detached HEAD"
[detached HEAD e4d68b3] Did changes in detached HEAD
 2 files changed, 1 insertion(+)
 create mode 100644 foo2.txt
Now, we want to merge the changes to branch feat-3, so let´s switch to it to continue:
~/projects/the_project: git switch feat-3
Warning: you are leaving 1 commit behind, not connected to
any of your branches:

  e4d68b3 Did changes in detached HEAD

If you want to keep it by creating a new branch, this may be a good time
to do so with:

 git branch <new-branch-name> e4d68b3

Switched to branch 'feat-3'
Your branch is ahead of 'origin/feat-3' by 2 commits.
  (use "git push" to publish your local commits)
Pay attention to the warning message. Just as the warning suggests, let’s create a new temporary branch:
~/projects/the_project: git branch detached-head e4d68b3Note that we did not switch to it though, we are still on the feat-3. Now it is time to merge the changes to the current feat-3 branch:
~/projects/the_project: git merge detached-head
Updating 5c027b3..e4d68b3
Fast-forward
 app.py   | 1 +
 foo2.txt | 0
 2 files changed, 1 insertion(+)
 create mode 100644 foo2.txt
The merge was succesful, and we can safely delete the detached-head branch:
~/projects/the_project: git branch -d detached-headThat wasn’t so bad after all, was it?
Restore deleted commits and branches
Sometimes we might make a little oopsie, and need to restore deleted commit or even branch. First, let’s see how we can do this for a deleted commit.
# Create a new file foo3.txt
~/projects/the_project: touch important.txt
# Add it to stage
~/projects/the_project: git stage important.txt
# Commit it
~/projects/the_project: git commit -m "Added important.txt"
Now for some reason we think that we made a mistake by creating this important.txt and want get rid of it. So, without further thinking:
~/projects/the_project: git reset --hard HEAD~1Oops. Big mistake, we needed the important.txt after all, and we poured our heart out while writing it. Can we get it back?
Well, luckily git is a version control system, and we cannot get rid of things that easily, if we are fast enough. Git keeps a reference log, or reflog in short, of all branch and other reference changes in the local repository. By default, the changes are stored for 90 days. So, in order to see if we can get our deleted commit back:
# Open the reflog
~/projects/the_project: git reflog
# Find the commit we want to restore, and copy its hash
# Then reset to that commit with
# git reset --hard [hash]
~/projects/the_project: git reset --hard bdd0406
HEAD is now at bdd0406 Added important.txt
It worked! Our important work is saved!
So what about a deleted branch then?
# Create new branch feat-4 and switch to it
~/projects/the_project: git switch -c feat-4
# Create new file handler.py
~/projects/the_project: touch handler.py
# Add it to stage
~/projects/the_project: git add handler.py
# Create new commit
~/projects/the_project: git commit -m "Added handler"
# Switch back to previous branch
~/projects/the_project: git switch feat-3
# Delete new branch feat-4 with force (-D)
~/projects/the_project: git branch -D feat-4
# Find the commit's id from reflog and copy it
~/projects/the_project: git reflog
# Recreate the branch and restore the commit
~/projects/the_project: git checkout 9c4b587
This will bring us back to the detached HEAD mode, but luckily we already know, how to get out of here. In this case, since we will not make any changes while in detached HEAD mode, there is no need to make any new commits, just recreate the original branch feat-4 and switch to it:
~/projects/the_project: git switch -c feat-4… and we’re off to the races!
This or that?
When merging changes from a branch to another, sometimes the change set contains conflicting changes, in other words same file has been modified in a way that git cannot automatically figure out what to keep. Let’s see how we can fix this with an example. Let’s start with a succesful automatic merge though, so we can progress one step at a time.
I our local repository, we have several branches:
~/projects/the_project: git branch
  feat-1
  feat-3
* feat-3-bonus
  feat-4
  main
The branch feat-3-bonus is based on feat-3, and contains an additional change (commit) we want to merge back to feat-3. The file app.py contains the following in feat-3:
import additional
#
# This is a comment 2
print("Hello from The Project")
print("This is another line of text.")
The same file in feat-3-bonus contains:
import additional
#
# This is a comment 2
# This is a comment from feat-3-bonus
print("Hello from The Project")
print("This is another line of text.")
The automatic merge from feat-3-bonus to feat-3 should be succesful, since the change is not conflicting with existing content in any way. Let’s try:
# Switch to branch feat-3
~/projects/the_project: git switch feat-3
# Run the merge
~/projects/the_project: git merge feat-3-bonus
Updating 63dc69d..240d39f
Fast-forward
 app.py | 1 +
 1 file changed, 1 insertion(+)
The merge was succesful, and done with Fast-forward strategy, since the feat-3 did not contain any non-linear commits after the feat-3-bonus was created.
Let’s make things one step more complicated, by deliberately making a new conflicting commit on feat-3 too before trying to merge.
# On branch feat-3, change app.py by adding new line 5:
# This is a comment from feat-3

# Then add and commit this change:
~/projects/the_project: git add app.py
~/projects/the_project: git commit -m "Changed app.py in feat-3"

# Then, switch to feat-3-bonus
~/projects/the_project: git switch feat-3-bonus
# And make yet another change to app.py by adding line 5:
# This is a comment from feat-3-bonus, 2

# Then add and commit this change:
~/projects/the_project: git add app.py
~/projects/the_project: git commit -m "Changed app.py in feat-3-bonus"

# Now switch back to feat-3
~/projects/the_project: git switch feat-3
# And try to do the merge again
~/projects/the_project: git merge feat-3-bonus
Auto-merging app.py
CONFLICT (content): Merge conflict in app.py
Automatic merge failed; fix conflicts and then commit the result.
So, the merge failed, and we need to decide what to keep and what to discard in order to create a succesful merge.
# First, let's check the status
~/projects/the_project: git status
On branch feat-3
Your branch is ahead of 'origin/feat-3' by 1 commits.
  (use "git push" to publish your local commits)

You have unmerged paths.
  (fix conflicts and run "git commit")
  (use "git merge --abort" to abort the merge)

Unmerged paths:
  (use "git add <file>..." to mark resolution)
	both modified:   app.py

no changes added to commit (use "git add" and/or "git commit -a")
Let’s dig in to the issue:
# Check the conflict
~/projects/the_project: git diff
diff --cc app.py
index fd5ab29,f378f8c..0000000
--- a/app.py
+++ b/app.py
@@@ -2,6 -2,6 +2,10 @@@ import additiona
  #
  # This is a comment 2
  # This is a comment from feat-3-bonus
++<<<<<<< HEAD
 +# This is a comment from feat-3
++=======
+ # This is a comment from feat-3-bonus, 2
++>>>>>>> feat-3-bonus
  print("Hello from The Project")
  print("This is another line of text.")
As we can see, the same line has been edited (obviously), and git cannot decide what to keep. This is where we jump to Visual Studio Code, since the conflict resolution is much easier to do in a visual manner, and VS Code offers a handy options to solve this problem. So, in VS Code, navigate to Source Control on the tool pane, and select the conflicting app.py:
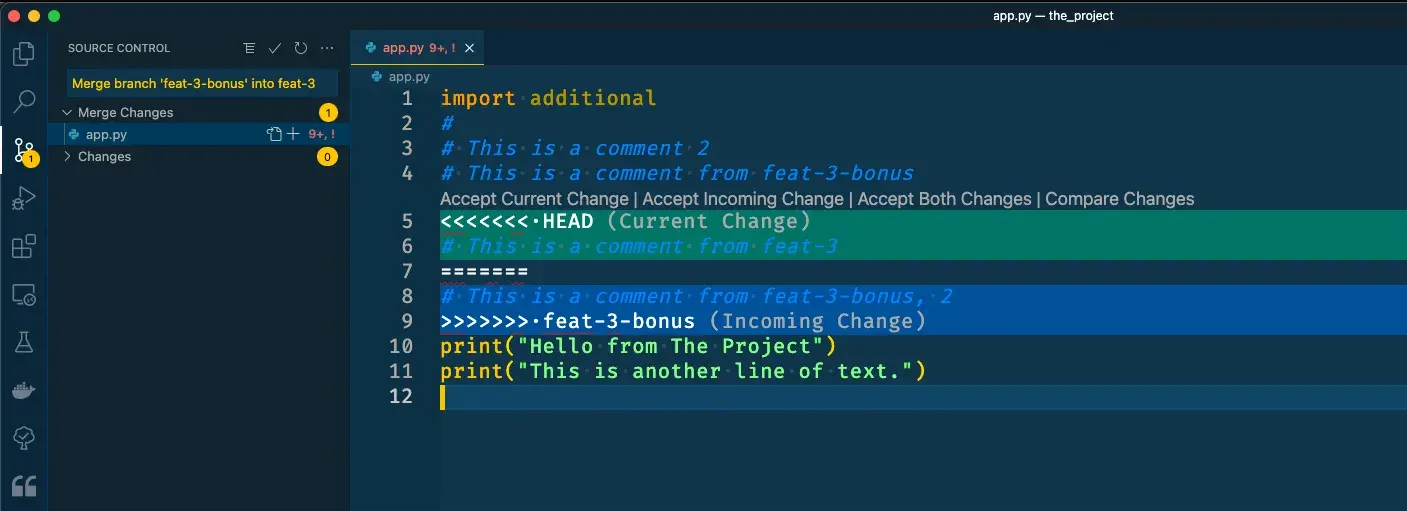 This gives us pretty much the same view to the conflict as the command line
 git diff did.
On top of the conflicting text block, we can see a few handy options, which VS Code offers us to resolve the issue. Current Change refers to the change done in the current branch feat-3, and Incoming Change refers to the change done in branch feat-3-bonus. We can select either of the changes to keep, of even both if we so desire. If we click the Compare Changes option, VS Code opens a handy side-by-side view to see the changes.
 Back in the previous view, and after evaluating what we want to keep, click the relevant choice in this case Keep Current Change. and save the file with Cmd + S.
We need to do the same for all conflicting changes.
Now that the fundamental issue has been resolved, let’s get back to the terminal, and continue with the merge:
# First, add all changed files to stage
~/projects/the_project: git add .
# And then commit the changes
~/projects/the_project: git commit -m "Merge branch 'feat-3-bonus' into feat-3"
[feat-3 361337f] Merge branch 'feat-3-bonus' into feat-3
And now the temporary branch feat-3-bonus could be deleted, and our development work can continue.
Where to go from here?
At least most git operations could be done with VS Code and with numerous other graphical git clients, in more or less point-and-click manner, but here we wanted to use the command line git as much as possible to learn how things actually work. That being said, the merge conflict resolution is one complicated task, where graphical user interface really helps.
Now that we have the basics for both git and GitHub under our belts, feel free to explore different git clients and find what suits you best. There are no right or wrong choices here, but I strongly recommend that you keep the grasp of the underlying tool too, because you will not always have an option to install GUIs.
There are many different ways to run development, not only Feature branch development. Explore these too, and find what suits best for you and your team.