Table of contents
Open Table of contents
Intro
I recently delve into the numerous opportunities of light-weight computing, in form of a Raspberry Pi 2. You can find out how to do the basic setup of the Raspberry Pi for this experiment in an earlier blog post.
Experiment
The aim of this experiment is to monitor the room temperature and relative humidity at my home and outside temperature at given intervals, and to publish this info in some form. I chose this simple experiment to be my first real application of my new IoT platform.
Sensors and communication
For this experiment I needed a couple of wireless temperature / relative humidity sensors and a way to communicate between these and Raspberry Pi. After a little bit of googling, I found these easily available at my local store and thus chose these ones without any further ado.
For sensors I chose couple of different ones to be able to test, if there is any diffecence in using them. The first one is ESIC WTH450H, which has an extension cord to get the outside tempterature and second one is Oregon THGN132N. They both communicate on an open and licence free bandwith of 433 MHz.
They both have some settings, which I set up as follows:
- Settings for ESIC WTH450H: House 10, Channel 1
- Settings for Oregon THGN132N: Channel 2
More on these settings and their meaning a little bit later.
To be able to receive this signal on Raspberry Pi, I need a gateway, and this comes in form of Telldus TellStick Duo, which in their words is
TellStick Duo is a USB-stick radio frequency transmitter and receiver that plugs into your computer (via USB).
It turns any computer into a wireless home automation center by being the link between your computer and electronics & ligths. It is also capable receiving signals from different devices.
Architecture
To keep things as simple as possible, but to get something out of this experiment, the architecture looks like this:
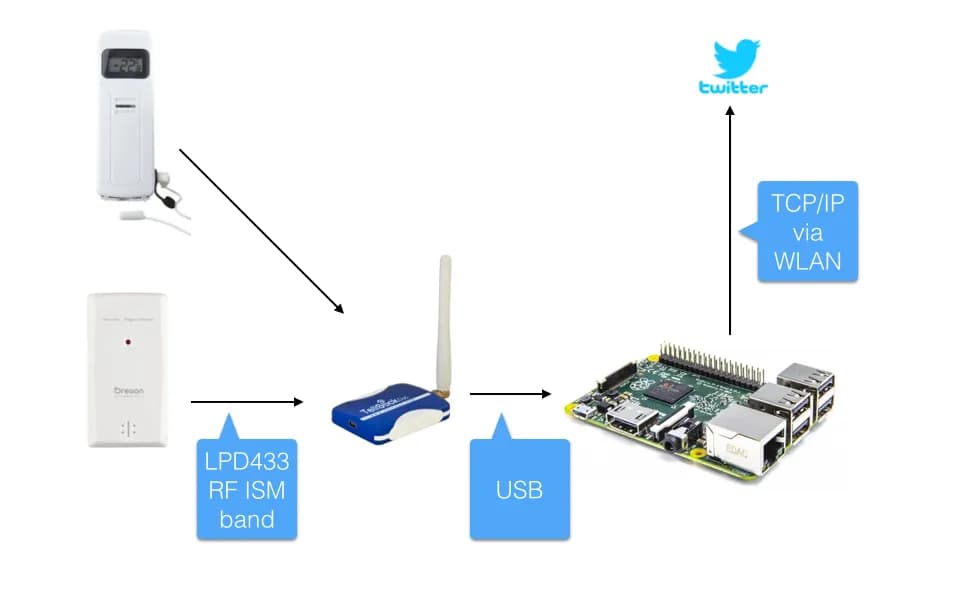
- Sensors communicate with Raspberry Pi via RF and TellStick Duo functioning as RF gateway
- TellStick Duo connects to Raspberry Pi by USB
- Raspberry Pi connects to the Internet via WLAN
Installing Telldus TellStick SDK
To be able to communicate with the TellStick Duo, Raspberry Pi needs the necessary Telldus-core library to be installed. Since there is no precompiled package, we need to do this ourselves.
To get started, lets make sure, we have the latest updates installed:
sudo apt-get update

sudo apt-get upgrade
After that, it’s time to get the sources. First, lets make the Telldus sources available:
# working directory (in Pi home)
cd source
mkdir telldus-core
cd telldus-core

# Make Telldus sources available to the distribution by editing
sudo nano /etc/apt/sources.list.d/telldus.list

# ... and add the line and save:
# deb-src http://download.telldus.com/debian/ stable main

# Make new key available and update package information
wget http://download.telldus.se/debian/telldus-public.key
sudo apt-key add telldus-public.key

# No need for the key after installing
rm telldus-public.key

sudo apt-get update
Compile and install telldus-core:
# If you have not done any builds previously, install
sudo apt-get install build-essential

# Then install the dependencies for telldus-core
sudo apt-get build-dep telldus-core
# This fetched the following packages:
# debhelper gettext html2text intltool-debian libgettextpo0 libunisting0 po-debconf

# Install other needed packages
sudo apt-get install cmake libconfuse-dev libftdi-dev help2man

# Download sources and compile
sudo apt-get --compile source telldus-core

# Install the 3 packages: libtelldus-core2, telldus-core and libtelldus-core-dev
sudo dpkg --install *.deb

# Clean up the sources
cd ..
rm -Rf telldus-core
This creates and installs new daemon /usr/sbin/telldusd, which you will later interact from Python.
Plug in the TellStick Duo, it’s time to test:
# Check that the device got connected
lsusb

# This should return something like
Bus 001 Device 005: ID 1781:0c31 Multiple Vendors Telldus TellStick Duo

# Then it is time to get the data from sensors with tdtool
tdtool -l

# This should return something like (under SENSORS):

Number of devices: 2
1	Example device	OFF
3	Magnetic	ON


SENSORS:

PROTOCOL            	MODEL               	ID   	TEMP 	HUMIDITY	RAIN                	WIND                	LAST UPDATED
mandolyn            	temperaturehumidity 	101  	2.3°	31%     	                    	                    	2015-03-09 21:33:07
oregon              	1A2D                	117  	23.5°	29%     	                    	                    	2015-03-09 21:33:31
And hey presto, I have just accomplished the first goal of my little experiment!
Twitter account and REST API keys
I chose to publish the gathered information on Twitter, to be able to incorporate some easy to use cloud service and to see the results on some service which I already use. I use Twitter REST API to communicate with the service.
I set up a new Twitter account for my bot and obtained the necessary OAuth keys. The keys are needed in the next chapter.
Python
For this experiment of mine, I use a Python script to get the sensor data via previously installed telldus-core library, process the data, and publish it to Twitter.
Raspberry Pi has Python already installed, so no need to install that (I’m happy with Python 2.7.3 for this project) 1. I do need additional Python package to communicate with Twitter REST API, so lets install pip, my Python package manager of choice:
sudo apt-get install python-pipNow we can install the necessary Twitter API wrapper python-twitter
sudo pip install python-twitterYou can find the Python script to run the experiment from GitHub. The code comments should explain it well enough to get you started. If not, please give me feedback!
I saved the code as /home/pi/apps/sensory.py and made sure it is executable:
chmod +x pibotti.pyAdditionally a Python wrapper to communicate with Telldus is needed; The necessary td.py can be obtained from the repo. Copy the file to same directory as sensory.py is stored.
The script can then be run from the bash with the command
python sensory.pyIf all went as it was supposed to, we have just tweeted succesfully. Go and see your bots Twitter feed!
Automation
In the previous chapter we got everything workin manually. Now it’s time to automate things with cron.
To add a new cron job, let’s edit the crontab for user Pi
crontab -eIn my case I want to run the job in the beginning of every hour, so I added this line to the file:
0 * * * * /usr/bin/python /home/pi/apps/sensory.pyNote: You have to explicitly define Python binary to use in cron jobs!
Save the file, and we are done!
Conclusion
With this simple project I was able to get started with the long and interesting road towards practical implementation of IoT and home automation. Total project cost stayed relatively low, and the current solution can be easily extended to include more sensors and controllable devices.
Get started, have fun and as always, get in touch and share what you did come up with!
Footnotes
-
Python 2.7.x is a mandatory requirement, the script and all dependencies are not Python 3 compatible at the moment. ↩